Thursday, November 11, 2010

Perfection? Nailed it.

Manicures - feel and look great when you get them, horrible when they get nicked as you zip your coat to leave, chip in 6 hours and peel in 48. What's a girl to do?

Having nice nails is something that's surprisingly important in my job.... people notice. And yet, it's not exactly the easiest thing to accomplish when my hands are in water all day long.

Enter the life-changing GEL POLISH.

I'd heard about this stuff, but didn't really understand it. It's just like a nail polish, except it's "cured" under lights rather than just drying. They do a little bit of scuffing the nail surface to ensure lasting result, but it's not nearly as damaging as the process used with fake nails.

I chose my polish (Gellish: Stand Out #37) and watched as my fabulous new manicure took shape. I LOVED IT!!!!!! So shiny, so smooth, so perfect, so professional. My nails looked ***perfect*** and I became instantly addicted.

Another share-worthy tidbit about this stuff - you can paint nail polish right over the top of your gel polish, and take it off (even with acetone) without damaging your gel manicure. It's a great option for people with really flimsy or ridge-y nails to create the strong, healthy appearance, even if you just opt for a translucent color choice.

Now, it's been two weeks (tomorrow) since my manicure and they're going strong. I have only one tiny chip on the very edge of my right pointer finger - aka the finger I use all the dang time to pick open various things or dig stuff from my teeth. But they're still fab. Here's a photo of my left hand with my two-week old manicure:

TWO WEEKS post manicure!

You may notice that you can see a tiny gap of outgrowth, but honestly it doesn't bother me one bit. Something to note is that the polish has to be removed in-salon.

I'll definitely do Gel Polish again, assuming there's nothing traumatic about the removal process. And this perfect shade of red may just have to be my signature color! It makes me quite a Stand Out, don't you agree?

Gel polish manicure available at Cole's Salon for approx $40

xoxo,

KM

Monday, October 18, 2010

Not just for pot smokers anymore...

Ladies, I don't imagine that many of you partake in such activities these days, but why must you walk around with blood-shot eyes day after day?

This may not be as much a beauty tip but more of a hello! wake up! reminder that eye drops do exist and do work wonderfully to give you bright white sparkling eyes. And in mere moments! It's like what tooth-whitening does for your smile, but in .000143% of the time!

I will say that this step is highly recommended if you ever wear blue or green eyeshadow, as those will LOUDLY broadcast any redness in your eyes, and prompt your coworkers to ask if you've been crying.... (or getting high in the copy room!)

To summarize: eye drops=good.

Back in everything but black!

Ladies and gents, I have returned to blogging. I know, you're thrilled.

Since last you've heard from me, I've graduated my Cosmetology program at the Aveda Institute Minneapolis, and started work at Cole's Salon in Eagan. My training program is about 15 weeks intensive, followed by continuous mentorship and development throughout my career. It's a lot of hard work, still, but I'm filled with passion and motivation for this business! I can't wait to really truly hit the ground running with a schedule filled with friends, family, strangers, referrals - all with whom I would love to connect, share and serve.

Because of my passion, incredible amounts of learning, and love of sharing and educating, I've been itching to spread the wealth. Sometimes I opt to live a bit vicariously through a blogging comrad and personal friend, Beauty Bets, by leaving wordy comments on her posts, but my needs and yours are much better served through this lil' gem here.

So I'm ready with quite a few ideas for posts and should be plugging some out in the next few days for your enjoyment. If you have any particular inquiries or curiousities that you'd like me to shed some light on, say so in the comments below and I'll drum up a post for you!

Be prepared for AWESOME.....

Until next time,
KM

Monday, May 3, 2010

Negating the "Lobster" Effect

As the sun shines brighter and the days become longer and more and more beautiful, many of us will find ourselves at happy hours, barbecues and outdoor baseball games (woohoo!) without realizing how powerful those rays really are. Until we get home and notice that we have an awkward, bright pink sunburn.

This is the perfect time to call upon a sunless tanner. Many scoff at how "orange" they look, but layered over the pink sunburn makes it look like a perfect and natural shade of summer glow.

Be sure to choose something with moisturizing benefits, as the sunburn most definitely needs that moisture to heal (and not peel). I like Jergen's Natural Glow, as it's cheapish, easy, and favored by many (read: tried-and-true). Choose the shade based on your skin tone, slather on, and you'll steer clear of pesky lobster jokes.

Grow, hair, grow!

It seems to be the goal in life for every 12-29 year old to grow Kim Kardashian-style locks. Long, lucious, luxurious.... Victoria's Secret Runway-worthy.

"I'm so happy I'm beautiful!"

Now, first of all, there's a lot of extensions involved in hair like theirs. Whether it be the every day variety, or supplemental tracks put in just for the show, there is a certain level of unnatural enhancement. But there must be a way to foster hair growth, yes?

I've had plenty of clients in my chair hoping to grow their hair out and wondering how to do so. Many say their hair just "stops growing" at a certain point.

The science of hair indicates that it grows 1/2" every month, or 6" every year. Science also shows that at any time, only about 90% of hair follicles are actually producing hair. Each follicle lasts about 2-6 years, sheds the hair, and takes a holiday (most restart unless there's a thinning situation). So if you think of a strand of hair being 6 years old, that's 3 feet at max (exceptions are inevitable), and then it's done.

"But KM, how do I make it grow??"

The secret to growth and health and thickness (all those desirables) is all about circulation and blood flow. Scalp massage is one of the best ways to foster circulation. I'm not talking the stress-relieving sort, I mean pinching the tissue to really get that blood in the skin. Stimulation is the name of the game. Hanging your head upside down for a period of time is another less-fun alternative to get some flow going.

To protect your hair from the rubbing motions, I really recommend using oil - my choice is Aveda's Beautifying Composition, because it's Jojoba-based (closest to skin's natural oil "sebum"), and because it's Lavendar and Rosemary fabulousness makes me so darn happy.

Of course, there are other things to consider, but many of them you've heard:
- Don't wash your hair too often - those oils are important.
- Be careful when putting your hair up, taking it down, or detangling not to pull those strands from the head. Start at the bottom and work your way up systematically.
- Sleeping position can have quite the effect on your hair - you may notice thinning on one side or the other. Tie a scarf around your hair to protect it, or consider a silk pillowcase, which doesn't catch the hair as much as cotton. If you can, adjust your sleeping choices.
- Minimize damage to the hairs by styling more gently, using less heat, protecting from the sun and intervening with your blondorexia.

....and once it's grown to obscene lengths, come see me to cut it off again ;-)

Friday, February 19, 2010

Staying Power

When applying eyeshadow in a beautiful, flawless, gorgeous way, nothing is more disappointing than watching it fade, crease, streak or disappear as the day/evening progresses. You sit in front of your mirror, blending it into perfection, and mere hours later see nothing but traces of your hard work. It's crushing really.


This little tube has possibly tripled my eyeshadow's wear time in a given day. I consider it to be foundation for my eyes - I apply it to the lids from lashes to brow before applying any shadow and allow it to dry. My powder shadows go on perfectly and blend evenly. It's absolutely worth the cost and has lasted me at least 9-12 months so far.

A little tip from my gals at Sephora: take a tweezers and yank out the "rim" of the purple tube after you think you've used it all -- just like a tube of mascara or lip gloss, that rim helps to clean the excess off the wand when removed from the tube. Thus, a lot of product is kept inside if you don't yank that thing out!

Tuesday, February 16, 2010

A Few Aveda Favorites

As a student of the Aveda Institute, one can imagine my access and immersion into the world of Aveda. And one would imagine correctly. You walk into my house and see a few bottles on the table of things I've picked up at discount for friends, an Aveda lip product or three in my purse, Aveda skincare in my medicine cabinet, Aveda styling products on my vanity and Aveda hair and body care in my shower.

Because of my frequent usage on both clients and self, I thought I'd throw a couple of favorites your way:
This hand lotion packs quite a punch - it moisturizes nicely but also improves the skin tone and quality. With it's natural exfoliants and vitamins, this is a must (especially during winter) for healthy and beautiful hands.

Beautifying Composition
Compositions are jojoba-based, which is the closest oil to skin's own naturally produced sebum. This little bottle of yellow oil is a huge value-add to your beauty repertoire and smells SOOOO GOOD! At AIM, we use it for everything from a moisture boost in Hand Relief to a relieving post-wax ointment. At home, use it to add extra moisture wherever needed - add to hand, foot, or body lotions, rub a bit into cuticles, use as massage oil, apply to patchy dry areas, massage into scalp before showering, or dot onto dry spots on your face.

Air Control
Smells amazing and has the lightest airy hold - a perfect hairspray for fine to medium hair and for voluminous looks. Use on dry hair only, but try before and after back-combing, flat ironing or curling to make results last longer. For a boost, spray underneath the hair by flipping head over or lifting up layers and spraying in-between.

Volumizing Tonic & Phomollient
This cocktail of products is great for creating oomph. The hold comes from the Phomollient, so use as little or as much as you need. Add Air Control (above) to finish.

Carribean Therapy Scrub
Sea salts, sugars and oils make for the most amazingly moisturizing scrub. After scrubbing and rinsing, some oil will be left behind on the skin, but let it stay in lieu of adding a lotion over top, and reap the softening benefits! The smell is herbal and amazing - like a quick getaway somewhere very warm and sexy.


Light Elements Smoothing Fluid
Flyaways? Static? Too poufy/fluffy? Seeking a shinier, more polished result to your style? This is your product - though it's not quite "hefty" enough to take on those who need the big guns. Take a few pumps of this amazing liquid, warm it between your hands and finger through styled hair.


Brilliant Anti-Humectant Pomade
Anyone with curly hair knows that humidity is death to a blowout. Anti-humectant is a thick, oil-based product that repels the evil water in the air that can instantly recurl straightened strands. After styling, warm and distribute between hands and lightly smooth over the surface and pull through the ends. A little goes a long way!


Smooth Infusion Style-Prep Smoother and Brilliant Damage Control
These two products are the options under Aveda's "Prep" step. Both go on damp hair after washing, before styling, however they serve separate purposes. Style-Prep Smoother is a great product for those with fluffy, curly, frizzy, dry, thick or coarse hair. It goes on sort of like a lotion and helps to smooth (as the name suggests). The Damage Control is a light spray that protects hair from heat styling, provides a UV shield and adds a bit of shine. It works on all hair types. These products can be used together and along with any other styling products.

Do you have a favorite not mentioned or a question or two about Aveda products? Post 'em! I think they make some excellent products, and hope to help you to discover a new favorite or a new level of loveliness for yourself .


Thursday, February 11, 2010

Shear Genuis

If you're a hairstyle junkie, love the beauty industry or just like competition-based reality shows (read: Project Runway), it would be in your best interest to tune in on Wednesdays at 9pm to Bravo to catch a new season of Shear Genuis.

The show picks a grouping of talented and personality-filled hairstylists from a pool of applicants and throws them into competitive hair coloring, cutting and dressing challenges. From pedestrian to Avant Garde, makeovers to Editorial shoots, they cover plenty of bases in the hair industry. Whether you're a hair stylist or someone with hair that has been styled at some point in your life, you'll probably enjoy seeing what sort of creations and "before and afters" result.

As an aside, I'd like to point out that while this group of designers clearly is talented, it seems there was very heavy emphasis placed on potential for "tv crazy" when screening applicants. Exhibit A: yellow hair, gold bikini and roller skates. Crazy people make good TV, I guess.....

Every week, I'm going to attempt to blog my opinions about the episode a la Project Rungay (a fave blog of mine). While I realize that two episodes have already passed, I will hopefully manage to write up a little something about both of those before this week's airs.

***Bonus! Shear Genuis episodes are available on Comcast OnDemand under the TV Series listing!***

Back to Beautiful!

Hello lovely ladies (and gentlemen?)! After a prolonged silence, I've decided to hop back into beauty blogging. I've been dunked in cosmetic industry Kool-Aid for the last four months, and I'm busting at the seams to share the knowledge with friends, clients, and others.

As you may know, I'm a cosmetology student at the Aveda Institute in Minneapolis working towards licensure as a hair stylist. In our program, we've covered everything from cuts to colors, perms and relaxers, makeup, nails, skincare and Aveda product knowledge. In short, a little bit of everything! I'm filling up with great information, and want nothing more than to pass on the learnings and discuss with you.

As for KM makeup services.... I'm on a bit of an extended sabbatical. Because of my schedule and attendance requirements through Aveda, I've sadly had to turn down a handful of clients for the 2010 wedding season. If any of you are out there, I apologize! I've struggled with the idea of turning people down, especially considering my desire to build a clientele for both hair and makeup services. But it's mostly because of my love of making beautiful brides more beautiful on their wedding day - it's such a high, and I hope I can continue doing so at some point in the future.

So, welcome back, and watch for some new posts to come very soon! Anything in particular you'd like to hear about? An e-consult of sorts? Just comment and I'll try to cover it in a new post!

xoxo,
KM

Monday, August 31, 2009

Blog Referral: Beauty Bets

Meet Elizabeth Dehn: "Lifestyle" Editor at Minnesota Monthly magazine. She talks everything fashion, retail and beauty for the local mag. Elizabeth recently started to bring her beauty product reviews and experiences to the world of social media and because of it we are all the more educated.

Beauty Bets

My favorite aspect of this blog is Elizabeth's unique perspective: she has access to new, sometimes not-yet-available-to-the-public products and treatments. It's a part of this lucky lady's job to give consideration to these things thrown her way (assuming they're editorial worthy, of course) and she documents her findings for our benefit.

Two recent favorites: Matte About You and Quick Fix

While you're at it, explore the rest of her fabulous world here on the Minnesota Monthly Fashion & Shopping page.

My BEST skin advice.

It's very simple. And also free! Can you beat that?? I think not.

Without further ado....

THE HOT WASHCLOTH

I touched on this in the "Hey there, bright eyes!" post, but wanted to explore the idea further. As someone who's had varying skin issues, I can tell you that this very easy addition to my usual cleansing routine has made a WORLD of difference for me. So trust me that this is tried and true.
The hot washcloth "technique" isn't complicated, nor does it really require much explanation. The heat makes both your cleansing process and the products that follow all the more effective. It opens your pores, meaning that it's easier to clean out the gunk of the day and then soaks in those products used after the fact.

Cue awesome metaphor:
If you think of your skin as a tupperware container (I told you it was awesome), you would never wash the container with the lid still on, as it wouldn't be effective. Nor would you put your leftover ___ on top of the closed container. The heat opens up your pores tupperware containers so you can properly clean them and fill them with whatever your heart desires...

The new routine
Remove eye-makeup
Hot washcloth for a few minutes (I'll re-wet it twice to refresh the heat factor)
Cleanse
Treatment products
Moisture/SPF products

xoxo,
KM

(And now I'm imagining a tupperware container filled with clearasil and moisturizer.)

Thursday, August 27, 2009

Hey there, bright eyes!

There are plenty of reasons for one's eyes to look less-than-bright on any given day: lack of sleep, allergies, cold, morning after a fun night out (or a night in spent crying over an episode of Extreme Makeover: Home Edition).... And some folks just happen to have tired looking eyes regardless of outside factors.

Here's my method for combatting sleepy eyes!

1. CHECK YOUR EYES: And I mean the eyeballs themselves, here. Red? Itchy? Watery? All signs of fatigue (and other things). Plop in some drops -- my go-to kind is Clear Eyes: Dry Eyes + Redness Relief . (I always have to remember the purple plus red logo, or I get confused when standing in the eye drops aisle at Target....)

2. CLEANSE: Start with a hot washcloth on your face. Spend a good five minutes by the sink re-wetting and applying it to your face and neck. It'll open up the blood vessels and get that circulation going which will bring you an instant glow. Note that this easy trick will make your cleansing easier and your products more effective!

3. MOISTURIZE: Your skin needs some moisture! Be sure to use an eye cream to help soothe and return moisture to the delicate eye area.

4. MAKEUP: Do your face as you like, but this is all about the eyes.
- Dab on a little Benefit Erase Paste (concealer) around the eyes -- this brightening concealer will help bring some light and life back!
- Curl the lashes
- Use a very pale peach eyeshadow all over the upper eyelid (up to the brow) and into the inner eye corner. I use Revlon Matte Peach Sorbet almost daily!
- Use a medium/light neutral brown in the crease/brow bone area to give just a bit of dimension to the eye.
- Dab a little ivory shimmer right under the brow and in the inner eye corner.
- Line the upper lid only with black or brown-black eyeliner from the inside out, and add a little "cat eye" style wing on the outer edge.... just a little one!
- Swipe on some mascara and you're good to go!

So many topics!

I'm suffering from writer's block. Which is funny because this is only my third post :-) But seriously, I have so many ideas and I'm having a hard time picking just one! I start to talk about a product and go in to technique, or vice versa.... I could just talk all day about beauty products and advice. It's an addiction, really....

That being said, there are lots of posts to come! So stay tuned!!

Tuesday, August 25, 2009

Have you seen my lashes?


Disclaimer: this post was taken from my personal blog, so for those of you feeling a little de ja vu, my apologies!

There are so many people who just don't seem to get it when it comes to mascara and curling eyelashes. I find lashes to be a fairly important feature (read: crucial!) when it comes to makeup. Like the icing on a cake.... Cue blog post.

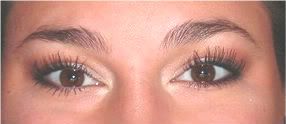
I consider myself to be a bit of a LASH MASTER. You can tell me how you have short, stubby or really thin lashes, but somehow I'll still make you look like this ----->

What's that you say? You don't WANT to look like you're wearing feather dusters on your eyelids? Oh come on....

Alright fine. I'll tone it down a bit for you.

There are three important aspects to fab lashes: curling the lashes, mascara and application technique. Let's delve into all three, shall we?

CURLING

Most men and makeup-challenged women will look at an eyelash curler and see a medieval torturing device. BE NOT AFRAID. If 12 year-olds can do it, so can you.

The tool of choice: The shu uemura. It is, as their site states, emblematic.Curling should be done before any eye makeup is applied. Open the curler, position the silver top bar right down along the lash line and against the lid, take a few seconds to make sure all the lashes are in between and then press together. This spot on the lashes is where you want the most bend, as it will make your lashes appear longer from straight on.

BUT, don't stop there! Move the curler out a bit on the lashes and pinch them there gently, move it out a little further and pinch there too. Look closely at your eyelashes, though, as you don't want the tips to be pointing back towards the lids. That indicates you've curled too much at the midpoints.

MASCARA

Everyone has their own preferences when it comes to mascara. I, for one, can't wear anything but waterproof. I can't explain it, but NON waterproof makes my pre-curled lashes straighten back out. Frustration ensues. So, I don't fight it and stick to the WP formulas.

While it's difficult to find that one kind that works well on everyone, I think I may have found a contender or two....

#1 Budget Fave: CoverGirl Lash Blast - While I tire of the "Fat tube = FAT lashes!" concept, I love this stuff - both the formula and the brush. Although it's a bit TOO fat at the end for those little corner lashes and lower lashes. For this, I recommend a tag-team approach using Maybelline Lash Discovery.

#2 Splurge Fave: Chanel Inimitable - Ahhhh perfection. For a mere $30 a tube, it can be yours. :::pauses::: My thoughts exactly.


APPLICATION

For many mascaras, a brand new tube means too much product comes out on the brush. A quick swipe through or dab on a piece of paper, paper towel or rough (so as not to leave lint) tissue/toilet paper should solve those goopy messy woes of a new tube.
Wiggle the brush side to side at the roots of the lashes to get the bristles in between them. Move the brush outward, continuing a little of the side-to-side to get a good coating. Add a couple more swipes to complete the first coat.After you've finished up the "first coat," it's important to take this moment to separate your lashes while they're still tacky from the mascara.

I SWEAR by metal eyelash combs a la the one at right by Tweezerman ($8). Nothing works better to really get in there, separate the lashes, get rid of gobs and make them look feathery.
Once you've done some separating, you can apply another coat. Annnnnd again, grab your comb and separate. This repetition will build up the thickness of the lashes while maintaining the separation.

Voila.
Hope this masterful enlightenment (cue the gong) brings you to a new level of lashiness.

^^ my real lashes! ^^

Monday, August 24, 2009

Welcome!

Hello and welcome to my lovely beauty world.

In an effort to share with you my updates, recommendations and various musings about beauty, I've opted to create a blog. And, fancy that, you've opted to read it!

I'm quite a "newbie" (in the professional sense) in the beauty industry, and just launching into a full-blown career in Cosmetology. I've been doing makeup for others for a good 10 years, but just started my freelance business this past winter in the throes of a flurry of weddings for friends.

I hope you enjoy reading my blog updates as they come. I imagine it will involve some commentary about recent or upcoming clients, website updates, product recs and technique tutorials, as well as some bits and pieces about life at the Aveda Institute.

Comment freely, ask questions, and try things for yourself!

Ciao!
KM